MyPhoneExplorer Android Auto Sync via Windows Task Manager
I think that title gets a +5 on the geek scale! So, I’ve tried to do this before with my old HTC HD2 and had mixed results. The problem I had back then was that MyPhoneExplorer would get launched when any USB device was connected, not just the phone. As you can imagine that was a bit annoying. Now I have a shiny new Samsung Galaxy Note I thought it was a good time to take another stab.
What is the goal? I use a free application called MyPhoneExplorer (MPE) to sync Outlook 2010 x32 with my phone. I sync my contacts, calendar, notes, tasks and custom directories. It works really well but you have to connect the phone and then manually load MyPhoneExplorer. That’s means loading it from the start menu and then clicking the multi-sync option. How much effort is that?! Ok, not much but it’s more than I can be bothered doing each time. The goal is to get MPE to load automatically when the phone is connected, do an automatic multi-sync and then close MPE. Took me like an hour to work it out and searching the depths of the interweb it seems nobody else on the planet has posted how to do this so I felt it would be a nice thing to share.
A word of warning, this is a bit tricky and is not recommended for noobs ? I’m going to assume you have MPE installed and have it fully working with your phone already. This guide is just covering how to get it to do everything automatically. We are going to use MPE, Windows Task Scheduler and Windows Event Viewer. I’m running Windows 7 but this should work the same with Vista. Not sure about XP. My mini guide for that is UPGRADE YOUR OS!
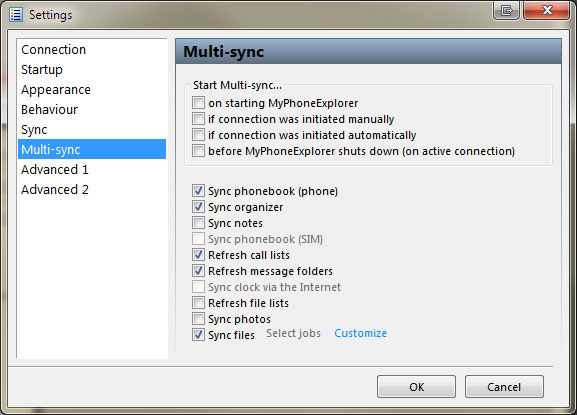
The first step is to get MPE setup correctly. Load it up and go File->Settings. If it already works then you shouldn’t need to alter the “Connection” page. We’re only interested in 3 pages “Startup”, “Sync” and “Multi-sync”. Here is what mine look like:
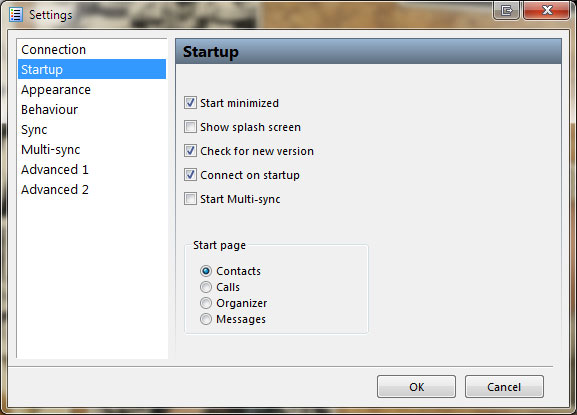
Tick “Start Minimized” and “Connect on Startup”. Untick “Show splash screen” and “Start Multi-sync”. The reason we untick “Start Multi-sync” is because we will do this from the command line later on. You can leave it enabled if you want, it’s just that I prefer to get straight into the interface if I manually load it instead of waiting for the multi-sync to load. Let’s face it. If the auto-sync setup I’m guiding you through works then you probably won’t manually load MPE unless you want to change some settings etc. It’s just down to personal preference.
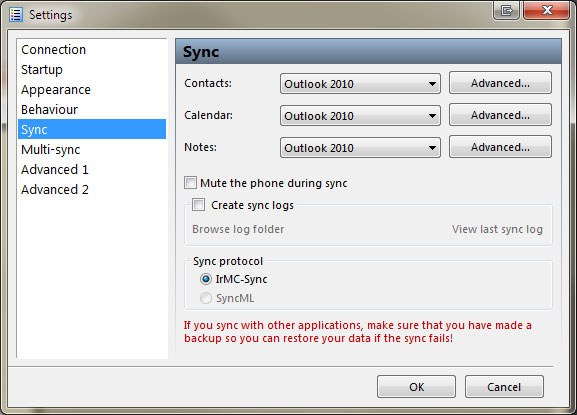
Make sure that your Contacts, Calendar and Notes are all set correctly to Outlook 2010. Use the Advanced button next to each of those to pick which address book and calendars to sync.
At this point you should now have MPE syncing with your phone when you load it manually and click “Extras->Start Multi-sync”. Any problems with that side of things should be addressed in the MPE forums. We have now reached the bit that caused me all the grief, setting up the Task Scheduler task.
- Open Windows Task Scheduler which is in Control Panel->Administrative Tools->Task Scheduler.
- Select the “Task Scheduler Library” in the left hand tree and then in the top box in the middle right click and choose “New Task”. You can also do that via the right hand Actions panel. Don’t choose “Create Basic Task” as that doesn’t let you do what we have to.
- On the General tab give it name and a description.
- On the Triggers tab click the New button at the bottom. On the new popup select “On an event” from the top dropdown and then “Custom” from the “Settings” area. Set the “Delay task for” option to “30 seconds”. Do that because we are going to set the trigger to be the first event that fires when the phone is connected. There are a load more events that happen after that so we want to wait until those have all triggered. If we don’t do this then we might end up trying to sync with the phone before it has fully connected with Windows.
- Click the “Edit Event Filter” option in the Settings area. On the new popup ignore the “Filters” tab and instead click on the “XML” one. At the bottom tick the “Edit query manually” option. You can now type a custom XML query into the top box.
- Leave this all open as we are going to copy and paste something into there in a few minutes. First I have to explain how we find that information out which requires Windows Event Viewer.
Now you have to become a detective and work out what event is fired when you connect your phone. Open Windows Event Viewer (Control Panel->Administrative Tools->Event Viewer). The event we want to listen for is buried. Here is the path to it:
Event Viewer->Applications and Services Logs->Microsoft->Windows->DriverFrameworks-UserMode->Operational
- The first step is to make sure your phone is NOT connected.
- Clear the operational log. Right click the “Operational” node and choose “Clear Log”. On the popup I just chose Clear as I didn’t see any reason to save it. Now the middle section should be blank.
- Connect your phone and watch the top area of the middle section. You should see it say something like “New events available”. Right click the blank space below that and choose Refresh. You should now see a bunch of events. I got 41 events when I connected my phone.
- We are interested in the first one at the bottom of the list which should have an Event ID of 1003. Here’s what mine looks like when I double click it.
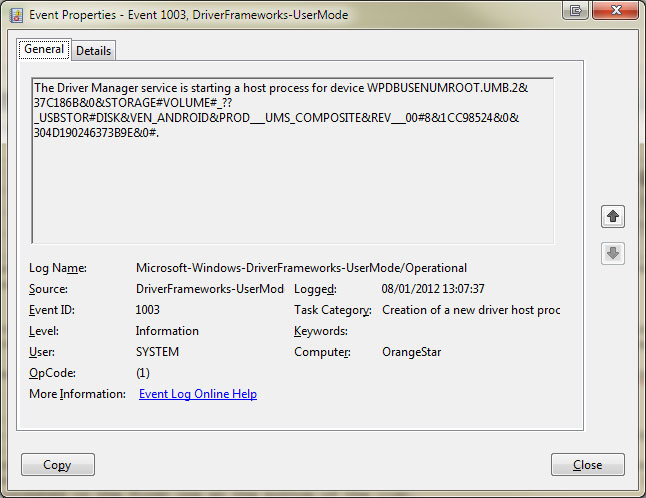
- There are three things we are interested with here. The path aka “Log Name”, the Event ID which is 1003 and the crazy string in the main message body: WPDBUSENUMROOT.UMB.2&37C186B&0&STORAGE#VOLUME#_??_USBSTOR#DISK&VEN_ANDROID&PROD___UMS_COMPOSITE&REV___00#8&1CC98524&0&304D190246373B9E&0#.
- That crazy string is the way Windows references your particular phone. It will be different for each person and each phone so the above works for me but won’t for you.
- Close that popup as I just got you to open it so you can see the bits we need to use. I’ll explain my earlier problems out a little bit so you can understand what we are doing now. Back in Task Scheduler in that XML box we can type stuff in, if you put in the crazy device string just as it is displayed then you will get an error when you try and save the event trigger saying that the data is invalid. This is because the string is not XML formatted. Head over to Opinion Geeks HTML Encoder and paste in the string to get a valid string we can use in the triggers XML box. For me it was just a case of converting all the & symbols into &
- Here is the string before: WPDBUSENUMROOT.UMB.2&37C186B&0&STORAGE#VOLUME#_??_USBSTOR#DISK&VEN_ANDROID&PROD___UMS_COMPOSITE&REV___00#8&1CC98524&0&304D190246373B9E&0#
- Here is the string afterwards: WPDBUSENUMROOT.UMB.2&37C186B&0&STORAGE#VOLUME#_??_USBSTOR#DISK&VEN_ANDROID&PROD___UMS_COMPOSITE&REV___00#8&1CC98524&0&304D190246373B9E&0#
- Close Event Viewer as we are done with it now.
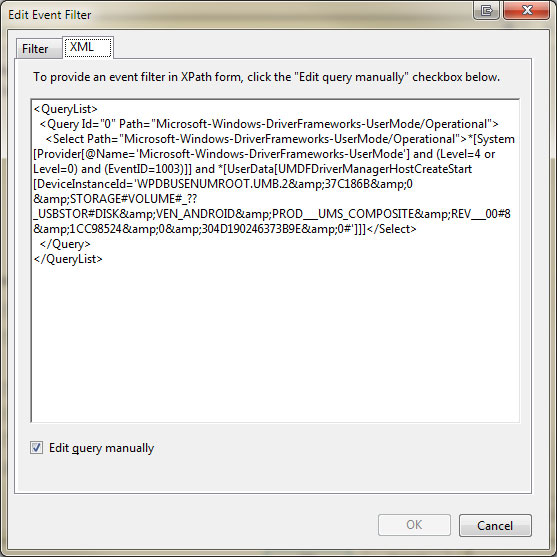
- Head back to the “Edit Event Filter” popup in Task Scheduler. Enter this as your XML:
<QueryList>

<Query Id="0" Path="Microsoft-Windows-DriverFrameworks-UserMode/Operational">

<Select Path="Microsoft-Windows-DriverFrameworks-UserMode/Operational">*[System[Provider[@Name='Microsoft-Windows-DriverFrameworks-UserMode'] and (Level=4 or Level=0) and (EventID=1003)]] and *[UserData[UMDFDriverManagerHostCreateStart[DeviceInstanceId='<strong>PUT DEVICE STRING HERE</strong>']]]</Select>

</Query>

</QueryList>
Note than when I tested this out and copy and pasted the above the final line was pasted as “< /QueryList>”, you need to change that back to “</QueryList>” without the spaces. Change the DeviceInstanceId bit to your XML/HTML encoded string. Remember to wrap it in quotes. Here is what mine looks like:
We are almost done. That was the trickiest part of this guide.
- Click ok to close the “Edit Event Filter” popup and then again to close the “Edit Trigger” popup.
- Select the “Actions” tab. This is where we tell it to do something when the event is triggered. A simple way to test our trigger is to load Notepad instead of MPE. Click the New button and choose “Start a program” from the action dropdown. Browse to the notepad.exe file inside C:Windows and click ok. Now click OK to save the task.
- Connect your phone. If everything went alright then you should see notepad open up. This is defintely a “phew” moment. Pat yourself on the back and cheer for a while.
- Back to work! Double click the task to open it for editing again. Go to the “Actions” tab again and double click the “Start a program” entry we created before. Browse to the MyPhoneExplorer executable. For me this was in: “C:Program Files (x86)MyPhoneExplorerMyPhoneExplorer.exe”
- In the arguments box enter: action=sync flags=closeafteraction syncitem=multi
- Click OK twice to save that and finish editing the task.
That’s it, you are done. If you disconnect and then re-connect your phone again you should see MPE load up, do the multi-sync and then close. Woohoo!
Comments: 3
It worked a treat. It was as complicated as you warned (and you actually forgot to say copy the Crazy String before you closed the pop-up) but I figured that out. I also copied the string into Notepad first, just to check the punctuation at each end.
Now when I plug in the phone, the MPE pop-up about starting the USB connection comes up, and then (as I have set the option in MPE) the queries about whether to keep the data on the PC or the phone. Once syncing has completed, the program closes.
Brilliant!
Why cannot the writers of the phone software not make things work so well?
Dear David,
many thanks for your amazingly clear guide – it is a rare treat when things are explained so concisely and thoroughly! It worked for me from the first time.
I wanted to ask your help in where I can find an event string that would trigger when MPE establishes WiFi connection with the phone.
I would really appreciate your help!
Best regards,
Ru
Hi Ru, sorry but I haven’t used this software for a very long time. I broke my HD2 and replaced it with a Galaxy Note. I’m on a Note Edge now and really enjoying it, looking forward to Marshmallow arriving for it next month.
I don’t do any “sync when connecting phone” stuff anymore because I picked a crap ROM to use which doesn’t support CIFS which means you can’t map to the phones storage directly with windows explorer. I’m too busy at the moment to flash a new ROM and will just wait for Marshmallow instead.
I still do less frequent manual syncs. On my phone I use a free Android app called Samba Filesharing which lets me share the phones storage over my home network. Once my phone is connected and windows sees the mapped network drives then I load up FreeFileSync where I have a few stored syncs setup. It does have a command line interface as well so once I’ve updated my phone OS and find some time to setup a full auto-sync system again I’ll probably just automate these two apps using a similar event system as in my main article.